
Banging Your Head Against the (Fire) Wall? Creating a Proxy Tunnel With Ansible
By William Phelps, Senior Technical Architect
In today’s IT world, it’s very common to encounter network restrictions in accessing resources between servers. The restriction often manifests itself as a firewall rule, keeping a server in a development environment from accessing a production server, for example. This practice keeps servers segregated from inadvertent or even malicious access but introduces a hassle to manage from a central server.
This article outlines how Ansible can be used to “tunnel” a server connection out of one environment through a bastion host to a port in another environment. The use case being described in this article is an Oracle SQLPLus session needing to get to a database server that resides in another environment. Please read the disclaimer at the end of the article.
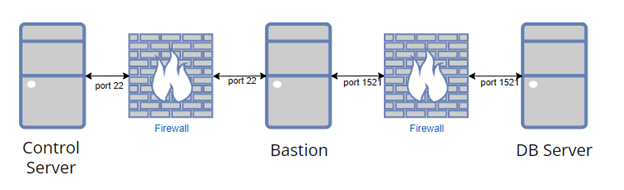
A “bastion” server serves as a gateway to access servers without granting direct access to the destination server(s). A bastion typically would be exposed to the outside world in some fashion, with “outside world” meaning that the bastion sits in front of one or more networks, with access to the networks having to come via the bastion. The rest of the servers have some level of ingress/egress access restrictions that require the passing of the request packet stream through the bastion. In some more intricate cases, there are multiple bastions that must be traversed in order to access a resource.
The environment setup is described as below:
- A Linux RHEL-compatible server (“controlServer”) with the Oracle SQL Developer client installed. The client software includes SQLPlus as part of the software package.
- A server (“DB Server”) hosting the Oracle database. (For this exercise the actual database operating system is totally irrelevant, as the access will be going to the database listener port.)
- A Linux RHEL compatible server (“bastion”) that is serving as the bastion host.
- “controlServer” can access “bastion” over SSH. The SSH port in this case is 22.
- A user with an SSH private key exists on “controlServer”, and the corresponding user exists on the “bastion” with the public key in the user’s “authorized_keys” file.
- The “bastion” has a network path to reach the database listener port on “DB Server”.
A simple picture gives a general idea of the basic conceptual flow. The control server issues a request to the bastion via a tunnel on port 22, and the bastion in return ”forwards” the request to the DB server via port 1521.
To execute the database portion of this overall request, the following items are needed so that a valid database connection string can be constructed:
- database user and password
- database service name or SID
- database hostname or IP address
- database listener port
For simplicity, the Oracle EZConnect syntax will be employed for the SQLPLus execution. As an example, if the database resides on server “abc123” with a listener port of 1521, and a service name of “foobar”, the user “myDBUser” with a password of “myUserPass” will result in a connection string as “myDBUser/myUserPass@//abc123:1521/foobar”.
(There is an intentional reason to avoid directly editing any tnsnames.ora files. The idea is to make the overall solution as portable and as less “OS level access dependent” required as possible.)
For the bastion access portion of this exercise, the following items are needed:
- A user account on the control server to login via a Putty/console session (i.e. “controlUser”).
- A user account on the bastion server (i.e. “bastionUser”) to login via ssh.
- While a username/password combination can be used, the safest approach is to use a public/private key file.
- The “private” key must reside on the control server in a location where “controlUser” can access the key, and the “public” key resides in the “authorized_keys” file in the /home/bastionUser/.ssh folder. (Again, for this exercise the idea is to stay simple… an ssh agent to manage keys could be used, but the idea is to be as portable as possible.)
On the control server, the following software is required:
- Ansible (yum install ansible on RHEL compatible Linux). Keep in mind that Ansible cannot be installed on Windows. The control server will have to be a ‘nix base distribution.
- Oracle SQLDeveloper or some flavor of the Oracle client that has the SQLPlus utility. Verify that SQLPlus will launch correctly before trying to run it via the playbook being created.
Finally, the appropriate ingress/egress rules must exist in firewalls to allow communication. Specifically, there must be a route available from the control server to the bastion, and a route from the bastion host to the DB server host over the appropriate ports. There is no need to have a route between the control server and the DB server; there would be no need for this article if such connectivity already existed!
Now that the majority of the pieces that are needed are in place, let’s discuss the general steps needed in the Ansible script.
- Create a simple sql file that can be executed via SQLPlus. This is done by adding the file name to the end of the SQLPlus invocation as mentioned ealier, i.e “sqlplus ‘user/pass@connection’ @myFile.sql”.
- Copy the file to a location on the control server.
- Create the tunnel.
- Run the SQL script.
- Destroy the tunnel.
It’s necessary to first look at how this tunnel would be constructed outside of any Ansible framework, as eventually we will take those commands and work them into the Ansible playbook.
The rough outline of the command appears as follows:

The next table explains the breakdown of each piece of the command. (“ProxyCommand” is a bit more backwards compatible than using the “-J” or jumphost option, so it’s used for this example.) Also note that some of this extended command could be offloaded into the server’s ssh_config file, but as stated earlier, the intent of this article is to minimize the need to touch files that the executing user simply may not have access to modify.
| Parameter | Meaning/Intent |
| -i | identity or key file |
| -f | Requests ssh to go to background just before command execution. This is useful if ssh is going to ask for passwords or passphrases, but the user wants it in the background. |
| -N | Do not execute a remote command. This is useful for just forwarding ports. |
| -L | Specifies that connections to the given TCP port or Unix socket on the local (client) host are to be forwarded to the given host and port, or Unix socket, on the remote side. (More to come on this topic.) |
| -o | option ServerAliveInterval=20 – letting SSH know to send a packet to test for a response from the server every 20 seconds |
| -o | ProxyCommand -q: quiet -i: identity or key file -W: Requests that standard input and output on the client be forwarded to host %h on port %p over the secure channel |
Use the following steps to create and run the tunnel scripts.
- On the control server, create a SQL script file with the following content as shown. This script will simply show the server host variable as reported by the DB.
Name this file “db_tunnel_test.sql” and save it in the control user’s home directory for simplicity. Be sure to include the trailing slash as shown.
Omitting the slash will cause SQLPlus to hang and the Ansible script will not complete.

- The actual playbook example itself is brief, as it’s intended as “conceptual” code, not “production” code. To preserve formatting, the following representative screen print of the file is provided.

- Name the file “playbook_tunnel_test.yml” and save it in a location on the control server.
- Invoke the playbook with the appropriate inventory if the connection details are not defined within the playbook, i.e.
“ansible-playbook -v -i inventories/inventory_prod.ini playbook_tunnel_test.yml”
Note the following highlights in the script above:
- The “vars” section could be expanded within the file or abstracted out into a separate file. Some items that would normally be stored in variables were shown directly in the file for clarity.
- The “shell” command shown in the first task of the playbook uses a line continuation feature of Ansible to allow the presentation of a rather long line in a condensed fashion (“>”). At the end of each line of that specific invocation, there is a single space plus a carriage return, and Ansible will keep picking up the next line until it gets to a line without a trailing space. Pay attention to the indentation of each of the next line(s); they must line up with the first “s” of “ssh”, and do not use tabs.
- In the “Executing simple DB test script” task, notice that the SQLPlus invocation is actually using environment variables for db user and db user password that are created and subsequently destroyed at the end of the task. This is done to avoid displaying username and password in the output when using “-v” or having the username and password printed in the logs. A “nolog” option can be added to the Ansible task definition, but that approach can be problematic when trying to debug. (There is a way to thwart this attempt at credentials obfuscation, but that topic is not the point of this article.)
- Style-wise it is best practice to “add” the options/parameters for an Ansible module in indented fashion as shown, rather than name/value pairs as a single line. The playbook becomes longer but the playbook becomes much more readable.
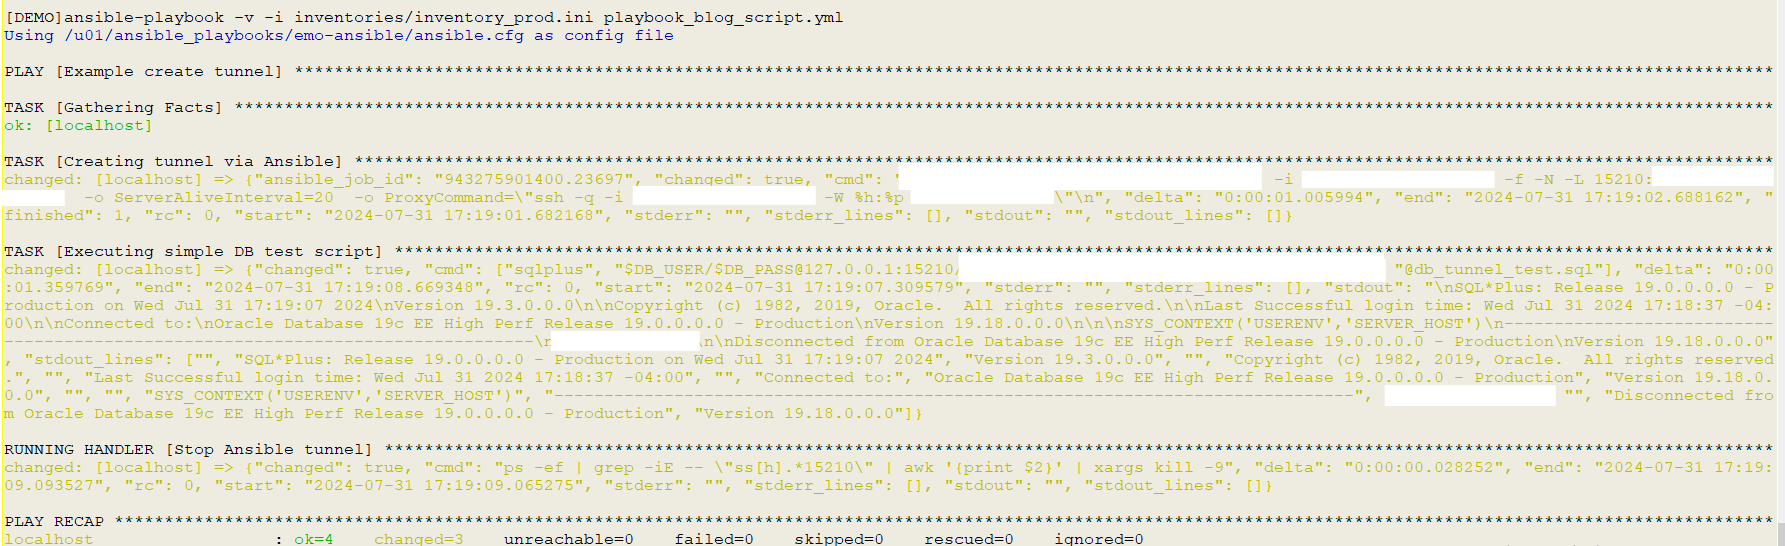
The following successful (and redacted) output is shown.
Still banging your head on Ansible problems? Contact us for assistance using the form below.
Disclaimer
The intent of this article is a basic “how-to” that strives to simply illustrate a basic process. Please review the solution and add additional steps/checks/processes as applicable to your use case. This article is not intended as “production-ready” for any/all cases, but “bare bones” to cover the concept as concisely as possible for educational purposes.