Executing an Oracle WebCenter Imaging Saved Search in BPEL
Executing an Oracle WebCenter Imaging
Saved Search in BPEL
By Marvin Martinez | Senior Developer
Introduction
The Oracle WebCenter Imaging APIs allow for integration through two forms: (1) through imaging Java APIs and (2) through standard web services generated with the Java API. This article will detail how to configure a BPEL process to call the Imaging Search Service and execute a Saved Search via web services, using the Web Service Adapter and return results to be processed within the BPEL process.
This article will detail the following steps:
- Add Credential Key
- Insert and Configure the Web Service Adapter
- Apply Security Policy
- Assign and Invoke Search Service
- Test Request and Receipt of Search Service Invocation
The steps outlined in this article will leverage a sample Saved Search in WebCenter Imaging that allows for searching invoices by various criteria, including Amount, Description, Date, etc. Additionally, this article assumes a BPEL process has already been created.
Add Credential Key (if necessary)
If not already created, a credential needs to be added to store the credentials for calling the Search Service.
To add the credential:
- Go to the Enterprise Manager
- Expand the Weblogic Domain folder and right-click the domain.
- Expand Security and select Credentials.
Once on the Credentials screen, click the Create Key toolbar button.
Select oracle.wsm.security (should already be present) in the Select Map field. Give the key any name and select “Password” for the Type. Note the name of this key as it will be used when applying the security policy to the web service adapter. Populate the credentials as requested and click OK to finish creating the key. The key is now ready to be applied to the partner link after it is created.
Insert and Configure the Web Service Adapter
First, a Web Service Adapter must be inserted so that it can be used within the BPEL process flow. Open the composite.xml of your BPEL project. From the Component Palette, drag a Web Service Adapter over to the gray column on the right side (“External References”) and configure it to reach the WebCenter Imaging Search Service URL (http://serverName:Port/imaging/ws/SearchService?WSDL).
Note: In the above screenshot, the WSDL URL has been abstracted. However, the URL mentioned above would go in the WSDL URL field (http://serverName:Port/imaging/ws/SearchService?WSDL).
Configure Web Service adapter as shown above (with correct URL) and click OK.
Wire up the main process to the PartnerLink (SearchService).
Apply Security Policy
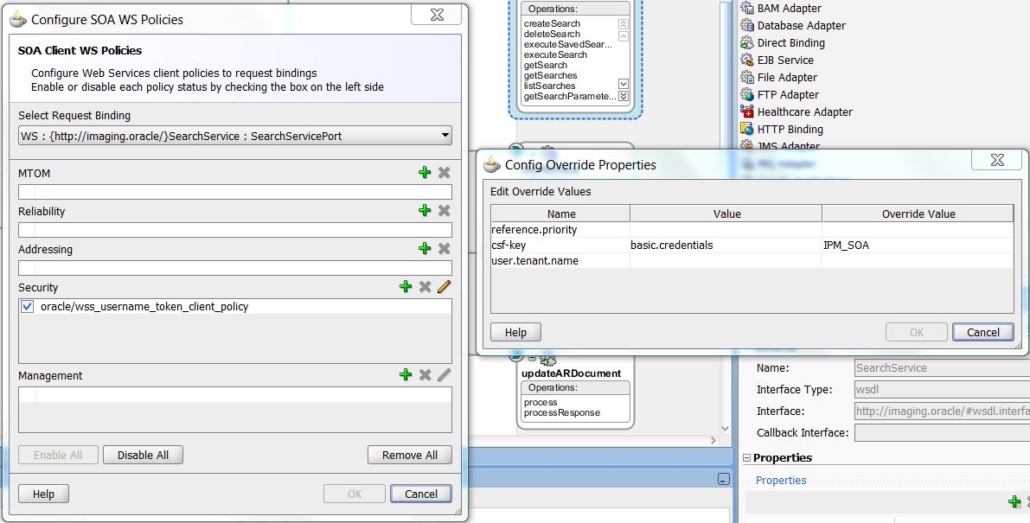
Once the web service adapter is inserted, apply the Security Policy for successful communication and authentication to the WebCenter Imaging Search Service. Right-click the adapter (SearchService component in image in previous section) and click Configure WS Policies.
Click the “+” button in the Security section and select the oracle/wss_username_token_client_policy policy. Click OK. Once created, ensure it’s checked and selected and click the Edit button (pencil). Populate the screen as shown above in the Config Override Properties window. The Override Value should be the name of the key you created earlier. Click OK and OK on the policy configuration window to return to the composite.xml.
Assign and Invoke Search Service
In your BPEL process, from the Component Palette, under the BPEL Constructs section, drag an Invoke activity onto the BPEL process canvas. Name the activity, select the desired Operation and create input/output variables for the operation. For this article, the executeSavedSearch operation is being employed.
Link the Invoke activity to the newly created SearchService partnerLink in the grey bars beside the process flow. You may have to search around the canvas a bit to find it.
Now, drag a Transform activity (Component Palette, under Oracle Extensions section). Place it just before the Search Service invoke. The source variable should be a BPEL process variable that contains all of the values that will be used for the search parameters. Select the input variable created in the Invoke activity for the Target Variable. Type a name for the mapper file and click the “+” button beside it to generate a new transformation map.
The transformation map shown above is a sample, completed map. For this example, the map contains 3 search parameters.
Below is how the transformation map will look upon initial creation, on the target side:
The searchArguments is where the parameters will be included. Drag a for-each from the component palette to the searchArguments node.
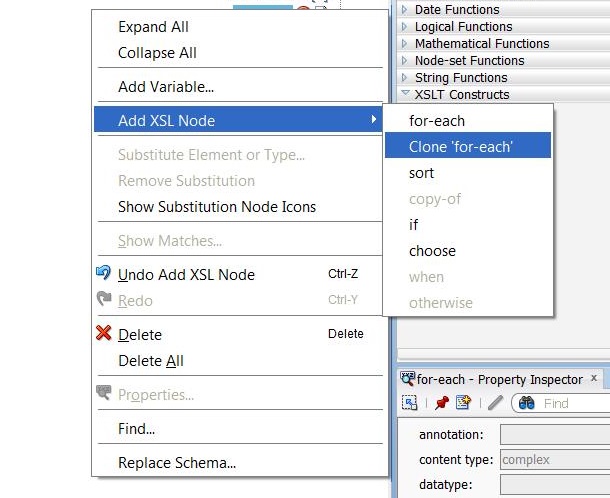
For multiple parameters, right-click the for-each node that was just created and select Add XSL Node à Clone ‘for-each’. This will create a copy of the entire node. Do this until you have created the necessary number of nodes for your search arguments.
Now, begin populating the search service parameters. First, under the searchNameId node, drag the element containing the Search Name from the source column (or, alternatively, you can set the name explicitly by right-clicking the node and selecting Set Text -> Enter Text…). You can also use the Search ID, if desired. Only one is required for identification.
For the search arguments, the following elements need to be populated:
Under searchArguments:
- OperatorValue – This is the textual representation of the operator value configured in the WebCenter imaging search. This value must match the operator configured in the saved search in WebCenter Imaging.
- Valid operators are: AND, BEGINS_WITH, CONTAINS, ENDS_WITH, EQUAL, EQUAL_TEXT, GREATER_THAN, GREATER_THAN_OR_EQUAL, LESS_THAN, LESS_THAN_OR_EQUAL, NOT, NOT_EQUAL, NOT_EQUAL_TEXT, and OR.
- parameterName – This is the name of the of saved search parameter in the WebCenter Imaging saved search. This value must match the name of the parameter in WebCenter Imaging.
Under parameterValue:
- typedValue – This element contains the actual value being passed to the saved search for the specified search argument. Drag the element value from the source variable to this element as well as the for-each node in the search argument for correct functionality.
- type – This element contains the type of the parameter in the WebCenter Imaging saved search. This must also match the configuration from WebCenter Imaging. Common values include DATE, DECIMAL, NUMBER, and TEXT.
- searchValueType – Same as above.
The image above shows one of the search arguments completed for a TEXT parameter in the saved search. Do this for each of the search arguments for the saved search that you want to use in your saved search call.
Save the transform and deploy your process.
Test Request and Receipt of Search Service Invocation
Once the process is deployed, the Search Service invocation can be tested. Below is a sample process trace showing the request data being sent to the SearchService for the invocation. The searchName is passed along with the search arguments as configured in the transform.
The response coming back is also important. Shown below is a sample response from a Saved Search call. Note the results node containing a list of result elements for each result in the Saved Search call. The columnValues elements contain the values in the Saved Search result columns configured in WebCenter Imaging. The columns represented by the column values are displayed at the bottom of the search results in the columns elements. The order of these column names are in direct relation to the order of the columnValues elements. In the example below, the “14.IPM_000202” column value was the value from “IPMDocumentID” column in the Saved Search, and so on.
These columnValues can be referenced by index for use in your BPEL process, as desired. For example, the reference the first result and access the TransactionId value for that first result, the expression would look something like:
Bpws:getVariableData(‘savedSearch_Output’,’parameters’,’/ns1:executeSearchResponse/searchResults/results/result[1]/columnValues[2]’)
This would get the first result in the result list and access the second columnValue which, in this example, is the TransactionID.
Conclusion
Once available within the BPEL composite, these Saved Search results can be used in any way desired. Using transformations, they can also be sorted or additionally filtered. This is quite a powerful method to allow a user to leverage the WebCenter Imaging Search Service without the need to write any additional code using Java APIs and keep the processing within a BPEL process.


