
Get Granular with Risked Based Alerting (RBA)
By David Cheever, Team Lead, Advanced Services
Introduction to RBA
Splunk’s Risk-Based alerting (RBA) equips security professionals to prioritize and respond to security incidents efficiently, helping them focus on mitigating the most substantial risks to the organization’s infrastructure and data. RBA aids in reducing alert fatigue, optimizing resource utilization, increasing fidelity, and strengthening the overall security posture by swiftly identifying high-priority threats.
This blog does not intend to provide a comprehensive explanation of RBA, as there is an abundance of existing documentation available for that purpose. Instead, the focus of this blog is to outline a distinctive approach to RBA that has proven highly successful in our experience.
Leveraging a Flexible Approach
Often when crafting a risk-based search we find that the option to assign granular risk scores is not inherently available through the user interface. With the current version of Splunk Enterprise Security (version 7.3 at the time of this blog), you can assign one risk score per risk object when using “Adaptive Response Actions”.
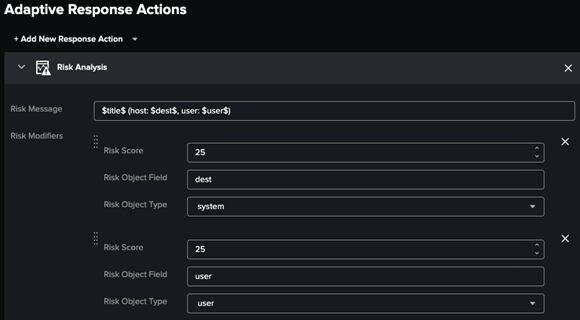
Figure 1
In Figure 1, what if we wanted to assign different risk scores based on the “title” field from the alert? With how risk is currently assigned, both a system triggering a “malware in registry detected” event and a user initiating a “Remote Desktop session” event would obtain an identical risk score.
One alternative is to create multiple correlation searches tailored for each specific use case, but this approach can quickly become hard to manage. An effective strategy we have found is utilizing lookups to assign risk scores. With this method adaptive response actions are not used and instead risk rule properties are included in the SPL. Below is a sample from a lookup with over 100 rows. Note the diversity in risk scores allocated to different risk objects based on the detection title.

Practical Example
In order to provide a comprehensive understanding of the approach, this section aims to delve into a practical example. Specifically, we’ll explore a correlation search that effectively employs lookups to manage and assess risks within Microsoft Defender data. By dissecting this example, we will gain insight into how lookups are utilized in the context of risk assignment, offering a clearer understanding of their functionality and impact within RBA.
First, we construct a query designed to examine the desired index/data. In this example, our attention is directed towards Antivirus data, with an emphasis on organizing outcomes by destination, title, and incident ID.
index=epav title IN ("*")
| eval user_account=coalesce('entities{}.accountName',
'entities{}.userPrincipalName','devices{}.loggedOnUsers{}.accountName')
| stats values(severity) as severity earliest(_time) as FirstTime latest(_time) as LastTime
latest(investigationState) as investigationState latest(status) as status values(alertId)
as alertId values("entities{}.detectionStatus") as detection_status values(user_account)
as user_account values(body) as body values(entities{}.ipAddress) as ipAddress
values(entities{}.fileName) as fileName values("entities{}.filePath") as filePath
values("entities{}.sha1") as sha1 values("entities{}.registryKey") as registryKey by dest
title incidentId
Next, we reference a lookup which breaks down each event title and provides a risk score to the risk object(s). This lookup enables us to apply more specific risk scores instead of employing a universal approach.
| lookup defender_risk_scores title OUTPUTNEW risk_score risk_object AS lookup_risk_object
| eval risk_object_type=case(lookup_risk_object="user", "user", lookup_risk_object="system","system",lookup_risk_object="user/system",mvappend("user","system"))
| mvexpand risk_object_type
| eval risk_object=case(risk_object_type="user", user_account, risk_object_type="system", dest)
| mvexpand risk_object
Finally, we identify supplementary fields utilized in risk notables, such as search_name and risk_message. Then we employ the collect command to transmit the data to the risk index.
| eval search_name="Defender - Event Alert - Risk"
| eval risk_message= title + " (" + risk_object + ")"
| convert timeformat="%Y-%m-%dT%H:%M:%S" ctime(FirstTime)
| convert timeformat="%Y-%m-%dT%H:%M:%S" ctime(LastTime)
| fillnull value=NULL risk_score risk_object
| search status!="Resolved" AND NOT risk_object IN ("NULL") AND NOT risk_score IN ("NULL")
| collect index=risk
Practical Assessment
This correlation search is used in our production environment and has significantly reduced unnecessary volume and increased fidelity. Prior to adopting this methodology, Defender data was not used to its full capacity simply because there were thousands of events per day. Each event looked worthy of investigation, but the reality is there was not enough time in the day to perform proper analysis on each individual Defender alert.
By integrating a lookup to dynamically assign risk, notables are generated only when the risk threshold is exceeded. This approach has significantly enhanced accuracy and provides additional context for contributing events, thereby enhancing the overall investigative insight.